
Chef vs Puppet vs Ansible | A Comparison Infographic
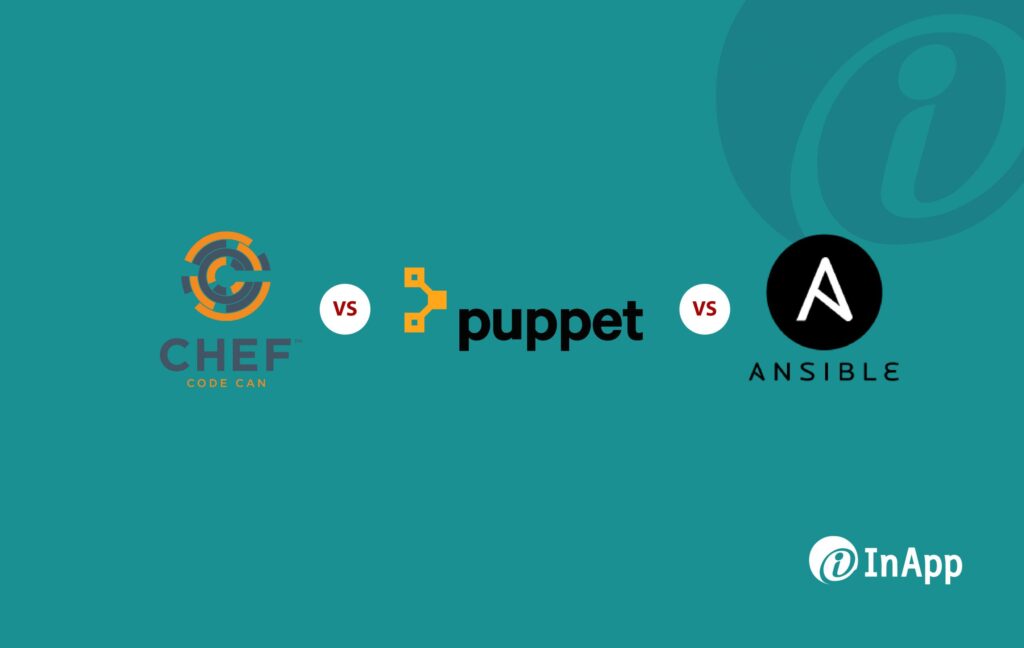
Chef, Puppet, and Ansible all are open-source deployment management tools, used to manage competently large-scale server infrastructure, by enabling speed and ensuring reliability, with very minimal input from developers and system admins, using different paths. Initial Setup Ansible: Less concentration on configuration managementPuppet: Simple installation and initial setupChef: Initial setup is complicated Interface Ansible: Simple and structured (built on Playbooks)Puppet: Very instinctive and complete Web UIChef: Designed exclusively for programmers Security Ansible: High Security with SSHPuppet: VulnerableChef: Chef Vault Scalability Ansible: YesPuppet: YesChef: Yes Code Ansible: Written in PythonPuppet: Built with RubyChef: Configured in Ruby DSL Pricing Ansible: Starts at $5000 per yearPuppet: Standard pricing starts at $120 per nodeChef: Standard pricing starts at $72 per node Feature Ansible: Automated workflow option for continuous deliveryPuppet: Strong compliance automation and reporting toolsChef: Offers hybrid and SaaS solutions for Chef server, analytics, and reporting Have questions? Contact the technology experts at InApp to learn more.
The 4 Key Factors to Keep in Mind while Choosing the Right Cloud Service Provider

The following are the 4 Key Factors you should keep in mind while choosing a Cloud Computing Service Provider. 4 Key Factors when choosing Cloud Computing Service Providers are: Business Health and Process Business knowledge and technical know-how Compliance audit Financial health Organization, governance, planning, and risk management Trust Technical Capabilities Change management Hybrid capability Ease of deployment, management, and upgrade Standard interfaces Event management Security Practice Security infrastructure Security policies Identity management Data backup and retention Administration and Support Performance reporting Service Level Agreements (SLAs) Billing and accounting Resource monitoring and configuration management Have questions? Contact the cloud computing experts at InApp to learn more.
6 Points to Remember Before Deploying Cloud Apps – An Infographic
6 Points to Remember Before Deploying a Cloud App Evaluate the different ways employees, partners, and customers access information and then map out data access and sharing points. Implement during slow periods – If people are focused on completing year-end, mission-critical activities, it wouldn’t be the best time to implement cloud. Don’t roll out all features at once – It’s just too much for the end-user to absorb. Prepare for change management – Cloud Computing providers typically update their applications a few times a year. A cloud app user should have an update process, test scripts, and a team ready to respond. Create a repeatable process for testing and deploying product updates, and don’t rush it. Communicate any resulting shifts in job responsibilities. Have questions? Contact the cloud computing experts at InApp to learn more.
Amazon Web Services – AWS’s Latest Additions
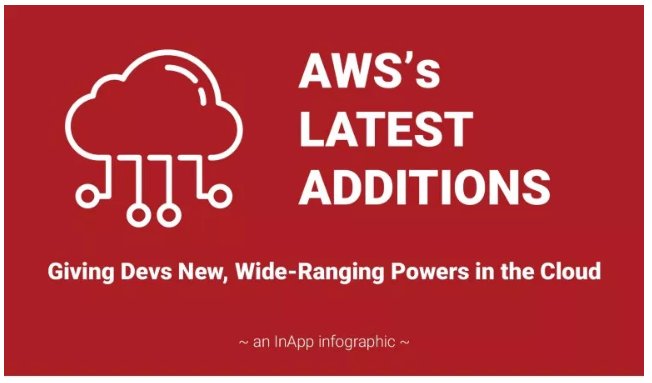
AWS’s Latest Additions Athena Start querying data instantly. Get results in seconds. pay only for the queries your run. Blox Open Source scheduler for Amazon EX2 container service. EC2 F1 Instances Run custom FPGAs in the AWS Cloud. Glue Easily understand your data sources, prepare the data, and load it reliably to data stores. Lambda@Edge Allows you to run Lambda functions at the AWS Edge locations in response to CloudFront events, without provisioning or managing servers, by using the AWS Lambda serverless programming model. Rekognition Deep learning-based image recognition – Search, verify, and organize millions of images. Snowball Edge Petabyte scale data transport with onboard storage and computing. Pinpoint Targeted push notifications for mobile apps. Polly Turn text into lifelike speech using deep learning X-Ray Analyze and debug production, and distributed applications. Have questions? Contact the cloud computing experts at InApp to learn more.
Key Steps for Successful ERP Cloud Migration
Key Steps for Successful ERP Cloud Migration Have questions? Contact the cloud computing experts at InApp to learn more.
The Path to Cloud – An InApp Infographic on Cloud Migration

Highlights Cloud adoption is strategic SaaS adoption has more than quintupled IaaS and PaaS adoption reaching a tipping point Data wants to be bigger in the cloud Have questions? Contact the cloud computing experts at InApp to learn more.
Top 5 Cloud Computing Trends This Year (2016)

Top 5 Cloud Computing Trends This Year (2016) Have questions? Contact the cloud computing experts at InApp to learn more.
Creating a Chat App Using NodeJS, ExpressJS, and Socket.IO
Socket.io is a trending library that allows bidirectional communication between client and server. It allows event-based communication between the client and server with very less code. It works on every platform, a browser with good speed and reliability. Node.JS is the perfect technology for real-time applications like chat applications and expressjs is the most popular web framework in Node.JS. Create an express application named chatApp “` $ express chatApp create : chatApp create : chatApp/package.json create : chatApp/app.js create : chatApp/public create : chatApp/public/stylesheets create : chatApp/public/stylesheets/style.css create : chatApp/public/images create : chatApp/routes create : chatApp/routes/index.js create : chatApp/routes/users.js create : chatApp/views create : chatApp/views/index.jade create : chatApp/views/layout.jade create : chatApp/views/error.jade create : chatApp/bin create : chatApp/bin/www create : chatApp/public/javascripts install dependencies: $ cd chatApp && npm install run the app: $ DEBUG=chatApp ./bin/www “` Move to the application folder. “` $ cd chatApp/ “` Just check the files created inside “` $ ls “` Now we need to install the dependencies. Dependencies are listed in the package.json. The current content of package.json file is “` { “name”: “chatApp”, “version”: “0.0.0”, “private”: true, “scripts”: { “start”: “node ./bin/www” }, “dependencies”: { “express”: “~4.9.0”, “body-parser”: “~1.8.1”, “cookie-parser”: “~1.3.3”, “morgan”: “~1.3.0”, “serve-favicon”: “~2.1.3”, “debug”: “~2.0.0”, “jade”: “~1.6.0” } } “` To install the dependencies use the following command. “` $ npm install “` Now if you check the app.js file you can find lots of code. Remove everything and add the following code var app = require(‘express’)(); var http = require(‘http’).Server(app); http.listen(3000, function(){ console.log(‘listening on port:3000’); }); Run the application using “` $ node app.js “` listening on port:3000 Create an index page with the following code and save the file with name index.html <!DOCTYPE html> <html> <head> <title>Chat App NodeJS+Socketio+ExpressJS</title> </head> <body> Hello world </body> </html> Now in the app.js we need to set the router for the index.html. For this add the following code inside the app.js app.get(‘/’, function(req, res){ res.sendfile(‘index.html’); }); $ node app.js listening on port:3000 Now check the URL http://localhost:3000/ Now we need to install the socket.io. You can install socket.io using the following command $ npm install –save socket.io Now check the package.json and you can find that the socket.io is added to it with the version. { “name”: “chat”, “version”: “0.0.0”, “private”: true, “scripts”: { “start”: “node ./bin/www” }, “dependencies”: { “body-parser”: “~1.8.1”, “cookie-parser”: “~1.3.3”, “debug”: “~2.0.0”, “express”: “~4.9.0”, “jade”: “~1.6.0”, “morgan”: “~1.3.0”, “serve-favicon”: “~2.1.3”, “socket.io”: “^1.3.5” } } Add socket.io into HTML code using <script src=”https://cdn.socket.io/socket.io-1.2.0.js”></script> and update index.html with the following code <script type=”text/javascript”> var socket = io(); </script> Update app.js with the following code io.on(‘connection’, function(socket){ console.log(‘New client is connected to the server’); }); Now update index.html with input box and send button <!DOCTYPE html> <html> <head> <title>Chat App NodeJS+Socketio+ExpressJS</title> </head> <body> <ul id=”messages”></ul> <form action=””> <input id=”m” autocomplete=”off” /><button>Send</button> </form> <script src=”https://cdn.socket.io/socket.io-1.2.0.js”></script> <script src=”http://code.jquery.com/jquery-1.11.1.js”></script> <script type=”text/javascript”> var socket = io(); var name = window.prompt(“What is your name?”); socket.emit(‘login’, name); $(‘form’).submit(function(){ socket.emit(‘sendMsg’,{by:name, msg: $(‘#m’).val()}); $(‘#m’).val(”); return false; }); socket.on(‘newUser’, function(name){ $(‘#messages’).append($(‘<li>’).text(name +” is online”)); }); socket.on(‘getMsg’, function(res){ $(‘#messages’).append($(‘<li>’).text(res.by +”: “+res.msg )); }); </script> </body> </html> Here we are creating a socket connection and emitting the message that the user type in the text box. We are getting the name of the user using the prompt. then sending a login event to server. Now we need to listen to these events in server and handle them properly. So open the app.js file and update the io.connection function as: io.on(‘connection’, function(socket){ console.log(‘New client is connected to the server’); //listening to the sendMsg from client. socket.on(‘sendMsg’, function(msg){ console.log(‘message: ‘ + msg); //emiting the getMsg event to all the sockets that is connected. io.emit(‘getMsg’, msg); }); //Listening to the login event. socket.on(“login”,function(name) { //emitting the newUser event to all the clients io.emit(‘newUser’, name); }); }); Now in the command line type the following code. This will run our application $ node app.js Now open your browser and go to http://localhost:3000/ and enjoy the chat Have questions? Contact the app development experts at InApp to learn more.
Understanding Security Assertion Markup Language (SAML)
What is Security Assertion Markup Language (SAML)? Security Assertion Markup Language (SAML) is an XML standard that allows secure web domains to exchange user authentication and authorization data. Using SAML, an online service provider can contact a separate online identity provider to authenticate users who are trying to access secure content. In InApp, we developed a SAML-based Single Sign-On (SSO) service in a different project that provides partner companies with full control over the authorization and authentication of hosted user accounts that can access web-based applications that we had developed. Using the SAML model, our implemented project acts as the service provider and provides services. InApp project team implemented SSO login for their MyApp Web & Mobile application project. Here SSO workflow describes based on the MyApp web application & Mobile project. Understanding SAML-based Single Sign-On (SSO) The following process explains how a user logs into a hosted web application through a partner-operated, SAML-based SSO service. Here is the detailed step which is mentioned in the image. The user attempts to reach a hosted application, for example, MyApp. MyApp generates a SAML authentication request. The SAML request is encoded and embedded into the URL for the partner’s SSO service. The RelayState parameter containing the encoded URL of the MyApp application that the user is trying to reach is also embedded in the SSO URL. This RelayState parameter is meant to be an opaque identifier that is passed back without any modification or inspection. MyApp sends a redirect to the user’s browser. The redirect URL includes the encoded SAML authentication request that should be submitted to the partner’s SSO service. The partner decodes the SAML request and extracts the URL for both MyApp’s ACS (Assertion Consumer Service) and the user’s destination URL (RelayState parameter). The partner then authenticates the user. Partners could authenticate users by either asking for valid login credentials or by checking for valid session cookies. The partner generates a SAML response that contains the authenticated user’s username. In accordance with the SAML 2.0 specification, this response is digitally signed with the partner’s public and private DSA/RSA keys. For this implementation, the developer should integrate the SSO Certificate (.crt) validation while developing. The expiry period of the certificate will be different for each provider. The partner encodes the SAML response and the RelayState parameter and returns that information to the user’s browser. The partner provides a mechanism so that the browser can forward that information to MyApp’s ACS. For example, the partner could embed the SAML response and destination URL in a form and provide a button that the user can click to submit the form to MyApp. MyApp’s ACS verifies the SAML response using the partner’s public key. If the response is successfully verified, ACS redirects the user to the destination URL. The user has been redirected to the destination URL and is logged in to MyApp. Have questions? Contact the technology experts at InApp to learn more.
Step-by-Step Neoload Tutorial in Performance Testing
Nowadays, most, software applications are written as web-based applications to be run in an Internet browser. Independent software testing provides key contributions in making sure the user experience and expectations are met to the highest level. The software industry is currently going through a highly competitive phase as Darwin says-“Survival of the fittest”; this is what will be noticed in this industry too. In order to survive the competition, the capabilities and incapabilities of a software application need to be tested. This includes testing for functionality, usability, and compatibility of the application across the environments it is used on. Along with this, a very important aspect is Performance Testing. Performance testing is a type of non-functional testing that is mostly recommended for business-to-business, business-to-customer applications. Performance testing can be categorized into load testing, stress, volume testing, etc. Common questions asked are, Will our application handle the load or, will it fall apart under load? How many users can our application handle, simultaneously? At what point does the server crash? Performance testing may answer the above questions. The cause of performance-related issues varies with the architecture and configuration of the application. Poor software, network configuration, poorly optimized software code, hardware configuration, etc. are some of the common reasons for performance degradation. One of the best and most emerging tools available to identify ‘performance issues’ in the market is NeoLoad. NeoLoad Tutorial NeoLoad was introduced by “Neotys” as a performance-testing solution for web and mobile applications. NeoLoad becomes popular with its simplicity in usage and easiness of analyzing reports. It allows, tracking statistics of the application infrastructures such as OS, database, and networks, along with the usual response time. Recording scenarios and analyzing its result in NeoLoad is just a 3-step process:- Installation 1) Download and install NeoLoad (for Windows) from the Neotys website 1.1) Install the downloaded exe file to your system. Designing Test Scenario 1) Open NeoLoad and create a project. 1.1) Select the “New Project option”. N3 1.2) Enter the project name and click Finish, NeoLoad design UI will appear. The design page contains three sections: Virtual Users– NeoLoad records the scenarios under the virtual user section, for the free version user can create up to 50 virtual users. To know more about virtual users click here. Populations– Populations are a group of virtual users, mainly used for monitoring the application behavior in different ways. Eg: an e-com application can be tested by simulating 60% of users browsing the site, and 40% making transactions under different browsers. To know more about populations click here. Monitors– NeoLoad supports monitoring of OS, Networks, Databases, Web/EJB Tier, etc. Adding and configuring monitoring machines are allowed through the monitor tab. For more details click here. 1.3) Recording with NeoLoad – virtual users can be created automatically by clicking the start recording button. After clicking the ‘OK’ button NeoLoad Container will open along with the selected browser window. Open the application and enter the Container name in the provided text box. In the above example, ‘google.com’ is the test site and the container name given is “Searching NeoLoad”. Based on the actions, the user can change the container name by just renaming the existing name- the rest of the actions will be recorded under the new container name. The reference video of the NeoLoad recording is here. The recorded scenario will be listed under virtual user profile containers as shown below. Users can apply conditions and loops just by dragging them from the actions menu. The selected request can be edited from the right-hand side. Running and Analyzing Results 1) For running the recorded scenario a population should be created from the population tab. Go to populations Click on the ‘+’ button, enter the name, and click OK to save. In our example, we created only one virtual user, so that user scenarios are running by giving 100% population. After creating the population, assign that population to the runtime scenario. The settings required to run the load test are defined under this scenario page. After configuring the scenario page, the load test scenarios can be run by clicking the play button. After running the scenario a report will be generated. The generated report can be exported to PDF, HTML, XML, and Word formats. Select “Tools” from the ‘Test Summary’ page Then select “Generate Reports” from the “Tools” menu Then select the report type Then customize the report’s contents From the output options page, select the output format and click Finish to generate the report. The generated report can be compared with a predefined set of values using SLAs. SLA (Service Layer Agreements): It allows the user to set a baseline for performance statistics. By applying SLA user can compare the values in generated report with a predefined set of values. Neotys provides a wide range of support to their product NeoLoad through their blogs, websites, and communities. Have questions? Contact the performance testing experts at InApp to learn more.